Friday, 26 January 2018

'Always' Powertex seahorse

I think that there is something to be said for Seahorses they really have got it right! They mate for life and the males have the babies. Sounds good to me! So if you hadn't of guessed it already my blog this month is a little bit valentines.
I asked on my Facebook page what everyone thought about valentines and the resounding answer was that we should love each other through the year and not just on one day. I agree and for the most part the other half and myself generally forget to celebrate on the day. We don't make a massive fuss over it cause we have every other day of the year to show one another we love each other. A very important thing when you have been together for 13 years! 

I was going to do a journal but being as I have a few of these guys sitting in my craft stash I couldn't resist. And it was a perfect fit for my theme. This seahorse mdf shape is still available on the Powertex UK website. So if you wanted to make a little valentines creation for your loved one you can! 
You get a small square back plate to hold the pieces together as they arrive in two sections. I started by coating the back of the seahorse making sure it was dry before covering the front. 
 I love the mdf shapes I tend to throw every piece of detail and texture I can at a piece I work on. I also like to cut the shapes, I have a pair of jewelry pliers which cut through. If it's a thicker piece of mdf I tend to use my little craft saw. I lined the mdf heart flower up on the seahorses belly and drew lines as a guide for cutting.
 TOP TIP: Have an idea of where to place your pieces before getting messy. Take a photo to aid your memory, or lay the pieces next to your design as a rough guide.
 The left over hearts I cut from the mdf shape were placed on the tail and fin of the seahorse.
 I used some of the mdf letters on the mane, a daisy I had premade from the daisy mould, some old buttons from my nans button tin. Everyone has got a button tin right? and some of the drop outs which are my absolute favourites. 
 I decided I wanted some extra texture underneath all the embellishments so cut wallpaper and dishcloth to size to fit the shape of the seahorse. For the head and neck I used a palette knife and liberally coated in easy structure, make sure this is thoroughly dry before covering in powertex. It will hold embellishments in place should you wish to stick them on before it dries. 
 Then I place all the embellishments on and coated everything in bronze powertex.

So I was going to reach for my go to turquoise. But as I have already created a seahorse in this colour, I felt it would be fun to do burgundy and lilac powercolour with a hint of the new pearl pigments mixed into the varnish.

 I loved the colour of the button on the eye, so left it uncoated and stuck it, and the flatback gems and pearls I had in my stash with some transparent powertex.
 Hope you have been inspired this little project. Toodles Anna xXx

Monday, 22 January 2018

Powertex is a crafting game changer!

So why is POWERTEX  this wonderful universal medium such a game changer you ask? 


So before I was creating very fiddly and intricate time consuming pieces that I was getting bored of easily and finding difficult to finish. Along came Powertex and through Traceys training I learnt to ‘just go with it’ and ‘keep it simple’.


Ok, ok I hear you saying ‘well her work is still super detailed’ . Yes, I know I do struggle with the whole this is how we are going to ‘keep it simple’. I wrestle with the moto daily, But I’m ok with it because I have come to recognise that this is just my style. 


Now you may not think it by looking at my work but I feel totally freed up with this medium to create how I like. Not only that, I can upcycle my shoes, cover bottles, use up those pesky c.ds that I just can’t bare to throw away and turn them into beautiful wall plaques, create mixed media pieces on offcut planks of wood, fine art pieces and my newest truest love sculptures. What's not to LOVE about Powertex the amazing universal medium. Toodle pip Anna xXx


Saturday, 13 January 2018

National sticker day

There used to be a shop called Pickwicks in the old high street in Tunbridge wells and they had the most amazing selection of stickers. 

That I would cover my letter to my German pen pal with. The good ol' days.... when snail mail was a thing! I love stickers to this day. 


When my nieces were little we would send magazines and cards across to Canada and they would count the stickers to makes sure they had the same amount. Funny how something like a little sticker can hold such memories.  How about you?  Toodles xXx

Saturday, 6 January 2018

It's owl about the mixed media!

I love visiting Powertex UK hq I always get a sneak peak on the new ideas and products coming and going. I also sometimes get a chance to give a little input too! Which I think sometimes gives our Tracey a  bit of a headache! Yes, I do have a lot of ideas brimming in my head constantly. 
When I saw the new Mdf owl kit I instantly had to make a sample after all we were going to the NEC and did need something to inspire everyone with! Well that was my excuse right? 
As usual with most of my designs the 'keep it simple' motto we like to say at Powertex UK hq doesn't really apply to me. I seem to be that rebel that breaks all the rules and throws everything at it. I actually struggle when I am trying to create a simple piece.
But that's the fab thing about Powertex there is no right or wrong, so you can make it as simple or a complicated as you like. And your style will always shine through when you create. I always tend to go the mixed media route with a lot of the pieces I create. 
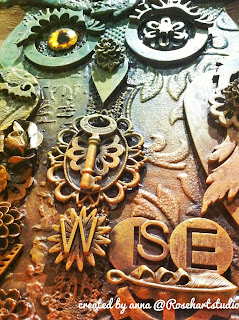
I've used some acanthus mdf pieces on the branch, above the eye and on the wing. A feather above the eye. And a couple of cogs on the body and branch. And some of the MDF dropouts scattered around here and there.
Then an extra helping of embellishments from Powertex uk and some stencilling and patterned wallpaper which is my favourite go to texture.
All coated in bronze Powertex dried and then dry brushed with red ochre, yellow ochre and turquoise power color and varnish.
Enjoy and have fun creating your owl!  Toodles Anna xXx