Showing posts with label The Secret Art Loft. Show all posts

Thursday, 21 June 2018

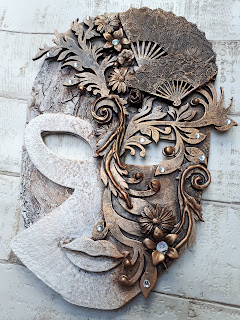
Masquerade mask Powertex style


Hi my lovlies, it's really great to have you here. Well this months project pack is absolutely enormous and I didn't even manage to use all of the pieces I still had some left over feathers and fans. Here is the second piece I created to inspire. Hope you have as much creating as I did. 


Top Tip:Always layout your items to give yourself an idea of where they are going to go. And take a photo on your phone to remind yourself. If it changes later on it doesn't matter.

I took some lace and cut it to size so the two fans had some added texture and pattern to them.


Top tip: Use a glue gun to create added dimension to your mdf pieces. My glue happens to be blue so it shows up nicely on the picture.

I also wanted the opening on the mouth to be smaller so snapped either side of the mdf shape and used some Powertex to hold it together in a different position.

I stuck everything down in place on the right side with Bronze Powertex. I used some 3D sand mixed in with the Powertex as some added texture in places. On the left side I used some stone art powder with Ivory Powertex and brown bister to build up a textural layer. And give it as soft stone art effect.

I coated the base layer in Ivory Powertex and mixed some Easy 3D Flex together and spread it across the left side and sprayed with brown bister.
I applied heat with the hair dryer to encourage the cracks to appear. I then dry brushed some Ivory back over the the texture and sprayed more bister and repeated until I was happy with the depth and tones in the finish.

Top tip: The heat from a hair dryer is less intense than a heat gun making it easier to control. 


I stuck the top piece of the mask down to the bottom piece using Transparent Powertex. The Easy 3D base layer is just subtly peaking through in places.

 Then dry brushed the Bronze Powertex with rich gold and bronze gold colortricx and varnish.

Then I just had to add some bling, so placed some gems from my stash on with Transparent Powertex.

And voila. The final result. This one was a little different for me if not ever so subtle. I found it very enjoyable to create a piece that pushed my boundaries though. I can't wait to see your creations do share them with us in the Powertex Studio. And do let us know if you have been inspired by any of the Design Team. We love to hear that you are getting inspiration from our projects. You can find more of my work @RosehartStudio. Toodles Anna xXx

Come and join the Masquerade


Well, what can I say other than Tracey has truely spoilt us with the Venetian Masquerade project pack she had put together for the month. It's such a big bundle of crafting goodies that I just had to create two projects. And even then I had some bits and pieces left over. 


So my first project is the half mask. I was looking at some of the traditional masks and was inspired by the Jester mask, their hats were made of cloth, were floppy with three points and had jingle bells on the end. So I wanted to incorporate this into the mask minus the bells just because I didn't have any but if you do you could always add them to the design. 


I made three points by taking some foil and folding it into a triangle shape which I then moulded round and used masking tape to hold in place. I also placed a roll of foil and taped into place across the brow of the mask to make the top of the curve more prominent. I then took some Easy Coat Mat and book pages and covered the rest of the mask.


Using some Bronze Powertex and kitchen roll I covered the hat section, added some wavy textile yarn around the points and a strip of lace ribbon across the bottom of the points.. And then place wavy textile yarn across the raised brow in Ivory Powertex. I put a light coat of Ivory over the book pages to dull down the text a little.


I broke apart the really large piece of swirly/ leafy detail mdf. And painted it with Ivory Powertex. 
Top Tip: You don't have to use the mdf pieces as a whole I gently snap them between my fingers. 

I found some little flower beads in my stash which I couldn't help but add to mdf pieces for extra detail. After painting them in Ivory Powertex I sprayed them with brown bister and then dry brushed in gold colortricx and varnish. This gave a lovely antique finish.

Then I must have got slightly carried away and forgot to take photos. However my next step was to add the Venice rice paper by spraying with a little water and using the Easy coat mat to stick it in place.

Top tip: You can layer the rice papers on one another to give extra detail. In this instance I had used book pages underneath so the writing showed through in places to add extra detail to the piece.

 Then around the edge of the mask I dry brushed some Ivory Powertex and then used some Gold colorticx as an accent. 

I found a metal element in my stash and an oval glass cabochon. I painted them with Ivory Powertex and then sprayed with brown bister for an aged look and then dry brushed the centre with turquoise powercolor and the metal surround in gold. Once dry I stuck the whole element down with Transparent Powertex and a little kitchen roll to hold it in place as it was at an angle so the paper acted as a bumper between the two.
I then heavily dry brushed the hat points and the wavy textile yarn on the brow in a mixture of turquoise and moss green powercolor. The wavy yarn around the points and lace detail was dry brushed in gold colortricx. 


I admit I felt a bit daunted by this months theme as it was unfamiliar territory for me but as usual pushing oustide of my comfort zone has made me really enjoy the project and end result. I have learnt some new techniques and explored areas I wouldn't have necessarily chosen myself, it's good to push outside of your comfort zone once in a while. Hope you enjoy creating with this one as much as I have. Do let me know what you think in the comments. Follow more of my work on my page Rosehart Studio. Do share your creations with us on Powertex Addicts United or in The Powertex Studio on Facebook. Toodles Anna xXx


Friday, 23 February 2018

Fairy house delights.

One of the projects I completed when demonstrating at the Powertex UK stand at the NEC hobbyshow in November was the new Fairy house which has now been put into a project pack for February. Just for you!


I had a lot of fun creating this piece I used the black Powertex on the base, one of my go to favourite colours in the Powertex range. On the lower part of the piece I used a mix of sand, balls and Powertex. Then added on the door, toadstools and windows. Added some extra detail with the mdf dropouts and cobwebs
On the roof I used the natural paper decoration, by cutting it into little pieces and layering it to give it a tiled 3d effect. I used some of the Powertex UK embellishments in between the natural paper decoration. I also added one of the new Raven mdf shapes. 

I then dry brushed with powercolours burgundy, turquoise and yellow ochre. And used the new interference colours to give a little shimmer effect to the roof. If you're looking for a magical project this month you need to get your hands on this one while stocks last. Toodles Anna xXx

Friday, 26 January 2018

'Always' Powertex seahorse

I think that there is something to be said for Seahorses they really have got it right! They mate for life and the males have the babies. Sounds good to me! So if you hadn't of guessed it already my blog this month is a little bit valentines.
I asked on my Facebook page what everyone thought about valentines and the resounding answer was that we should love each other through the year and not just on one day. I agree and for the most part the other half and myself generally forget to celebrate on the day. We don't make a massive fuss over it cause we have every other day of the year to show one another we love each other. A very important thing when you have been together for 13 years! 

I was going to do a journal but being as I have a few of these guys sitting in my craft stash I couldn't resist. And it was a perfect fit for my theme. This seahorse mdf shape is still available on the Powertex UK website. So if you wanted to make a little valentines creation for your loved one you can! 
You get a small square back plate to hold the pieces together as they arrive in two sections. I started by coating the back of the seahorse making sure it was dry before covering the front. 
 I love the mdf shapes I tend to throw every piece of detail and texture I can at a piece I work on. I also like to cut the shapes, I have a pair of jewelry pliers which cut through. If it's a thicker piece of mdf I tend to use my little craft saw. I lined the mdf heart flower up on the seahorses belly and drew lines as a guide for cutting.
 TOP TIP: Have an idea of where to place your pieces before getting messy. Take a photo to aid your memory, or lay the pieces next to your design as a rough guide.
 The left over hearts I cut from the mdf shape were placed on the tail and fin of the seahorse.
 I used some of the mdf letters on the mane, a daisy I had premade from the daisy mould, some old buttons from my nans button tin. Everyone has got a button tin right? and some of the drop outs which are my absolute favourites. 
 I decided I wanted some extra texture underneath all the embellishments so cut wallpaper and dishcloth to size to fit the shape of the seahorse. For the head and neck I used a palette knife and liberally coated in easy structure, make sure this is thoroughly dry before covering in powertex. It will hold embellishments in place should you wish to stick them on before it dries. 
 Then I place all the embellishments on and coated everything in bronze powertex.

So I was going to reach for my go to turquoise. But as I have already created a seahorse in this colour, I felt it would be fun to do burgundy and lilac powercolour with a hint of the new pearl pigments mixed into the varnish.

 I loved the colour of the button on the eye, so left it uncoated and stuck it, and the flatback gems and pearls I had in my stash with some transparent powertex.
 Hope you have been inspired this little project. Toodles Anna xXx

Saturday, 6 January 2018

It's owl about the mixed media!

I love visiting Powertex UK hq I always get a sneak peak on the new ideas and products coming and going. I also sometimes get a chance to give a little input too! Which I think sometimes gives our Tracey a  bit of a headache! Yes, I do have a lot of ideas brimming in my head constantly. 
When I saw the new Mdf owl kit I instantly had to make a sample after all we were going to the NEC and did need something to inspire everyone with! Well that was my excuse right? 
As usual with most of my designs the 'keep it simple' motto we like to say at Powertex UK hq doesn't really apply to me. I seem to be that rebel that breaks all the rules and throws everything at it. I actually struggle when I am trying to create a simple piece.
But that's the fab thing about Powertex there is no right or wrong, so you can make it as simple or a complicated as you like. And your style will always shine through when you create. I always tend to go the mixed media route with a lot of the pieces I create. 
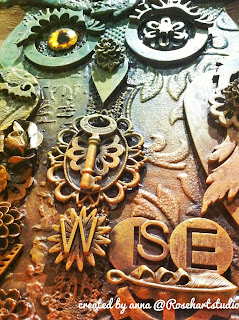
I've used some acanthus mdf pieces on the branch, above the eye and on the wing. A feather above the eye. And a couple of cogs on the body and branch. And some of the MDF dropouts scattered around here and there.
Then an extra helping of embellishments from Powertex uk and some stencilling and patterned wallpaper which is my favourite go to texture.
All coated in bronze Powertex dried and then dry brushed with red ochre, yellow ochre and turquoise power color and varnish.
Enjoy and have fun creating your owl!  Toodles Anna xXx