Tuesday, 27 June 2017

Thou shall have a fishy....

So this was a really fab project. It's always fun to create something out of the box with products you wouldn't have thought of using before. This was a piece I created for a sample to be shown on Hochanda. I had a nice mix of Powertex UK mdf shapes and embellishments and lace to use. And this is what I came up with...


As usual I gave thought to the layout of the piece. This did change as I progressed but it's much nicer to have a dry run before everything gets messy and covered in Powertex.


Top Tip: When you're making your stone art clay make a job lot of moulded embellishments. This saves you more time to play and concentrate on your project when you come to it. I've used the daisy moulds from Powertex UK I just love them!
https://www.powertex.co.uk/moulds/367-fossil-mould.html

Then I took some structure paste and using some of my templates including my Powertex UK arty quote stencil, I randomly stenciled the base. Once dry I had a play with some lace and textured material to give the base some more depth. I love the weaved mesh it has to be my favourite product and you can find some here in this pack:
 https://www.powertex.co.uk/additional-products/238-mixed-media-texture-pack-2.html


Once happy with the layout and composition I coated the whole thing in Ivory Powertex and I totally forgot to take a picture of it. But then sprayed with black bistre. And when I spray my bistre I like to completely saturate the piece.


Top Tip: I added some bling. I would recommend you do this right at the end with some transparent Powertex as when you come to dry brushing you tend to go over the gems and then you have to try and scrap the varnish and pigment off.

I used a damp sponge to take some of the black away and leave whiter areas in places. This look gives a smoother, softer finish than just using straight black powertex. Then it was on to dry brushing with yellow ochre, red ochre, and burdgundy powercolor with varnish and then some gold and pearl colortricx and varnish to add a bit or sparkle.
Enjoy and have fun creating. ❤ Toodle Pip Anna xXx ❤


Sunday, 25 June 2017

There and back again a Powertex tale

What an awesome experience to have been offered by Garry and Tracey of Powertex UK. I had the most amazing time at Hochanda. The whole team looked after me and made me feel right at home. I had so many ideas and techniques I wanted to share and didn't get through all of them. Maybe next time. If they will have me back :D


Now I can finally speak about my fabulous stamps that Tracey asked me to design for Powertex Uk. You will have seen me on the shows demoing them to you all. 


You can now buy these beauties on the Powertex UK website

We just love the power and romantic notions that Greek mythology conjours and so decided to use some of those figures for the names of our stamps. 


Aprodite's kiss being the first. She is certainly a lady full of grace, love and beauty.
https://www.powertex.co.uk/rosehart-studio-stamps/375-rosehart-studio-stamp-aphrodite-s-kiss.html


Then Cassiopeia is a constellation in the northern sky, named after the queen Cassiopeia in Greek mythology, who boasted about her unrivaled beauty. We think this cosmic feel stamp lives up to its name.


Welll, back to it now and creating more pieces to be able to share with you. I made sure to take photos of most of the samples I created for Hochanda and I've got lots more ideas that need to be created for the Birmingham NEC Hobbycrafts show at the end of June. Toodle pip Anna xXx 


Monday, 5 June 2017

It's the final count down......

It's very hard to describe my feelings right this moment. Erm.... excited CHECK! Feeling slightly sick....CHECK! Super nervous...CHECK! I have the faith, confidence and support of my Powertex family around me and I am hoping I do them and you all proud with my debut on Hochanda with our Tracey from Powertex UK
Am I ready......yes....but I have always been one of those people that has a back up plan, to the back up plan. I am hoping I have created enough samples and pieces to keep me going and keep you inspired. At the same time Garry and Tracey at Powertex UK and I are in collaboration on an exciting product which we will be launching on Hochanda first. 
If you like them I would put them in your baskets and checkout quick sticks. With many other goodies that you just won't be able to say no to! Loving all the fabulous new products brought to us by Powertex Uk, they really do know how to spoil us! 
I now have the final count down song stuck in my head, ha ha. Well, not for long. Rock choir tonight and I will be learning a new tune that I will undoubtedly get an ear worm from for the next week. See you all very soon on the telly box. Are you excited yet? Don't miss us on Hochanda sky 633 on June 8th and 9th.
Toodle pip Anna xXx

Tuesday, 9 May 2017

Rainbow Unicorn Dreams!

People often ask me if I can turn their ideas in to works of art. I've never said no even if I have no idea how I'm going to create the final piece. Pushing forward, constantly challenging myself and breaking out of my comfort zones and colours, mostly produces some of my most loved work.  


SO....its safe to say that I have pretty much fallen in love with this commission piece and will be sorry to say goodbye.


It is however going to a home where I know it will be loved and cherished as much as I would. And to be fair I can't carry on keeping all my work I fall in love with I would run out of room in my house and be poor! 


I hope you love this little rainbow unicorn wonder as much as I do. All created with my favourite universal medium Powertex. In exactly a month today I will be making my Hochanda debut with our Tracey and boy, oh boy do we have some exciting projects, ideas and NEWshhhhh.... products to show you.
  ❤ Toodle pip Anna xXx ❤ 


Saturday, 6 May 2017

Dotty about you!

Well, I know we've only just got through Easter but summer will soon be knocking on the door and reminding me of the days when as a child we would spend our summer holidays in Devon at my Nans. I think my favourite outing aside walking along the river Otter to Otterton Mill for cream teas and yummy swizz roll was the Ladram bay beach trips.

We would pack up the picnic basket and set off early. The whole day was filled with beach fun! Playing in the rubber dingy with my sisters and shrimping in the rock pools. Looking for the crabs, starfish and wonderful fishy creatures lurking under the rocks.

I have to say I never did manage to spot a sea horse. But they are rather lovely don't you think?


Which leads in nicely to my latest project that I am happy to share with you all, you lucky things! I decided to go a little crazy and use two colours on this piece. I was going to use some ivory too but I thought better off it and tried to keep it a little simpler. 


Top tip: Always give yourself an idea of layout and where you are going to place your items. I always take a picture of  the layout on my phone as a reminder. However, this is not mandatory and set in stone, sometimes I completely change my mind on layout once I get going. 


I wanted to make sure I added some kind of texture underneath the circles. So I gathered together all sorts of lace, corrugated card, wall paper, scrim to name but a few and started putting them in place to have an idea of where I wanted them.  


Next I removed all circles and got the base prepped with texture and colour. Blue Powertex for the top half and green for the bottom half.


So you may be able to spot on his belly I used my circle stencil and structure paste. I also used the arty quotes stencil in places but got a bit excited with some other texture and covered most of it up. But I'm ok with that. There really are no rights or wrongs or mistakes with Powertex, it's all about play, fun and going with the flow.

Next I put all the circles and flowers back into place and gave them a coat of Powertex. 

Top Tip: If you mix a little sand in with your powertex and gently brush over certain areas of the raised circles it adds a little texture and extra detail when dry brushing.


Then it was dry brushing time. I used yellow ochre powercolor along the neck, back and tail.Then popped on a little gold colortrix. For the front I mixed dark blue and pale yellow powercolour and added white for highlights with a touch of pearl colortrix for a little shimmer. And voila!


The mdf seahorse bases are available to buy at www.powertexuk.co.uk. However, I am afraid you are going to have to wait for the circles to be released on Hochanda on the 9th June. Sorry about that. But it's sure to be a great show I promise! I know what a tease, right. On the plus side you get to watch me on my Powertex tv debut! I know exciting right. Eeekkkk...not long now! Lucky I will be with our Tracey. Have we got some cracking stuff to show you! 
Toodle pip Anna xXx

Sunday, 26 March 2017

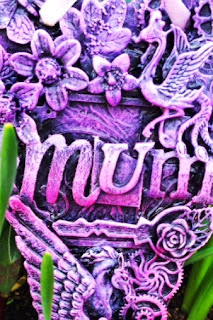
Mother's Day

I'm pretty fortunate to have my lovely mums support when it comes to my artist venture. 

She has always wanted me to follow my dream of becoming an artist. Today we had a lovely day with my Nan who is suffering from dementia. But we had her's and my favourite! Cream tea yum. 
 I made a special little Powertex heart in my favourite colours for mums present. Hope you all had a magical day making memories to treasure or remembering happy times with your mums. 
Toodle pip Anna xXx


Sunday, 5 February 2017

Mixed Media Steampunk 'Key to my Heart' journal project

 This little Steampunk inspired heart journal definitely has the key to my heart. I just loves it!
So I absolutely love the idea of steampunk. What is steampunk?

'a genre of science fiction that has a historical setting and typically features steam-powered machinery rather than advanced technology.'

What better combination than Powertex and steampunk to create the inspiration for this pretty little heart journal! All made from fabulous bases and embellishments available soon from Powertex UK.
Use your heart shape as a template to cut out your paper which will make up the pages for your journal. Place the heart blank over your cut out paper, using the holes in the top as a guide pierce holes through the paper with a sharp pointed tool. Ooooo, don't they look fabulously pretty?
Use the heart blank as a guide to cut around the silk paper and stick down with the Easy coat glossy. 

Tip time: Use a water spray bottle to help smooth out any wrinkles, a few sprays should do it. If you end up with a few wrinkles, don't worry they add beautiful texture to the piece.

The Easy coat glossy is the perfect consistency allowing for very little wrinkle anyway and gives a lovely smooth, non-tacky, glossy seal, unlike any other I've seen. Making it a brilliant Easy adhesive and sealant for the job! 
Tip time: Once dry run an emery board around the outside of the heart to clean up any paper overhanging the edges. It works wonderfully well and gives a really clean edge finish. 

Use your finger and wipe some black Powertex around the edges of the heart to give a distressed look. Allow this to dry, repeat to build up the layers and blend in. Then dry brush a little rich gold colotricx, or a lot, you can be as light or as heavy handed as you please. If you like the plain finish, feel free to leave them just as they are. 
Tip time: Always play with your embellishments beforehand to get an idea and feel for your layout. This design has been created just for you but this is a handy hint for future projects.

Now cut the scrim around the heart shape and cut your lace to fit.
Top tip: Leave some over hang on your lace. Once covered in black Powertex, stick down and dry, then trim the ends. Why is that? Well, you get a neater edge and if there is a small amount of shrinkage the lace will still touch right to the edges of the heart. Leaving them nice and neat. Or if you like a ragged edge, no problems, leave them as they are.

Coat all your embellishments by brushing the black Powertex over each piece and lay in place. With the metal embellishments paint them over, lay down and leave to dry. If they are not fully coated, just paint over them once dry and repeat process until fully coated.

Patience here is the key! See what I did there?
Lastly my favourite part, time to add the colour. Start by dry brushing on red powercolor, then add some white powercolor for highlights and finally a touch of rich gold colortricx. 
Remember this is only a guide with the techniques. There is no right or wrong, if you wish to change some of the colours or placement of embellishments, then use this project as a template to be inspired. It's all about having a play and most of all having fun with Powertex the medium we all love! 💖